“React 中使用HTML Intersection Observer来实现无线Scroll 和图片懒加载!
使用React实现无限滚动和图像懒加载
简述
在本教程中,我们将学习如何使用HTML Intersection Observer API来实现React组件中的无限滚动和图片懒加载。在这个过程中,我们将学习如何使用React的Hooks以及如何创建自定义Hook。
开始
如果你一直在寻找分页的替代方案,无限滚动是一个不错的考虑。在这篇文章中,我们将以React功能组件为背景,探讨Intersection Observer API的一些用例。读者应该对React功能组件有一定的使用经历。熟悉React Hooks的一些熟悉将是有益的,但并不是必须的,因为我们将考察一些。
我们的目标是,在这篇文章的最后,我们将使用原生HTML API实现无限滚动和图片懒惰加载。我们还将学习到更多关于React Hooks的一些知识。有了这些,在必要时你就可以在你的React应用中实现无限滚动和图片懒惰加载。
让我们开始吧。
The Intersection Observer API
根据MDN的文档,”Intersection Observer API 提供了一种异步观察目标元素与祖先元素或顶级文档viewport的交集中的变化的方法。”。
这个API允许我们实现诸如无限滚动和图像懒惰加载等酷炫的功能。The Intersection Observer 是通过调用其构造函数并传递一个回调函数和一个配置对象参数来创建的。每当一个元素(称为target)与设备视口或指定元素(称为root)相交时,回调就会被被触发调用。我们可以在配置对象参数中指定一个自定义的根,或者使用默认值。
let observer = new IntersectionObserver(callback, options);
API的使用很直接。一个典型的例子是这样的。
var intObserver = new IntersectionObserver(entries => {
    entries.forEach(entry => {
      console.log(entry)
      console.log(entry.isIntersecting) // 当目标元素与根元素相交时候为 true
    })
  },
  {
    // 默认配置参数
  }
);
let target = document.querySelector('#targetId');
intObserver.observe(target); // 开始监测
entries是一个IntersectionObserverEntry对象的列表。IntersectionObserverEntry对象用来描述一个检测中的目标元素与根元素的相交变化情况。应该注意,由于回调函数在主线程上运行因此该函数中不应该处理任何耗能的任务。
IntersectionObserver API目前享有被大多数浏览器支持,如可以参考caniuse上详细信息。
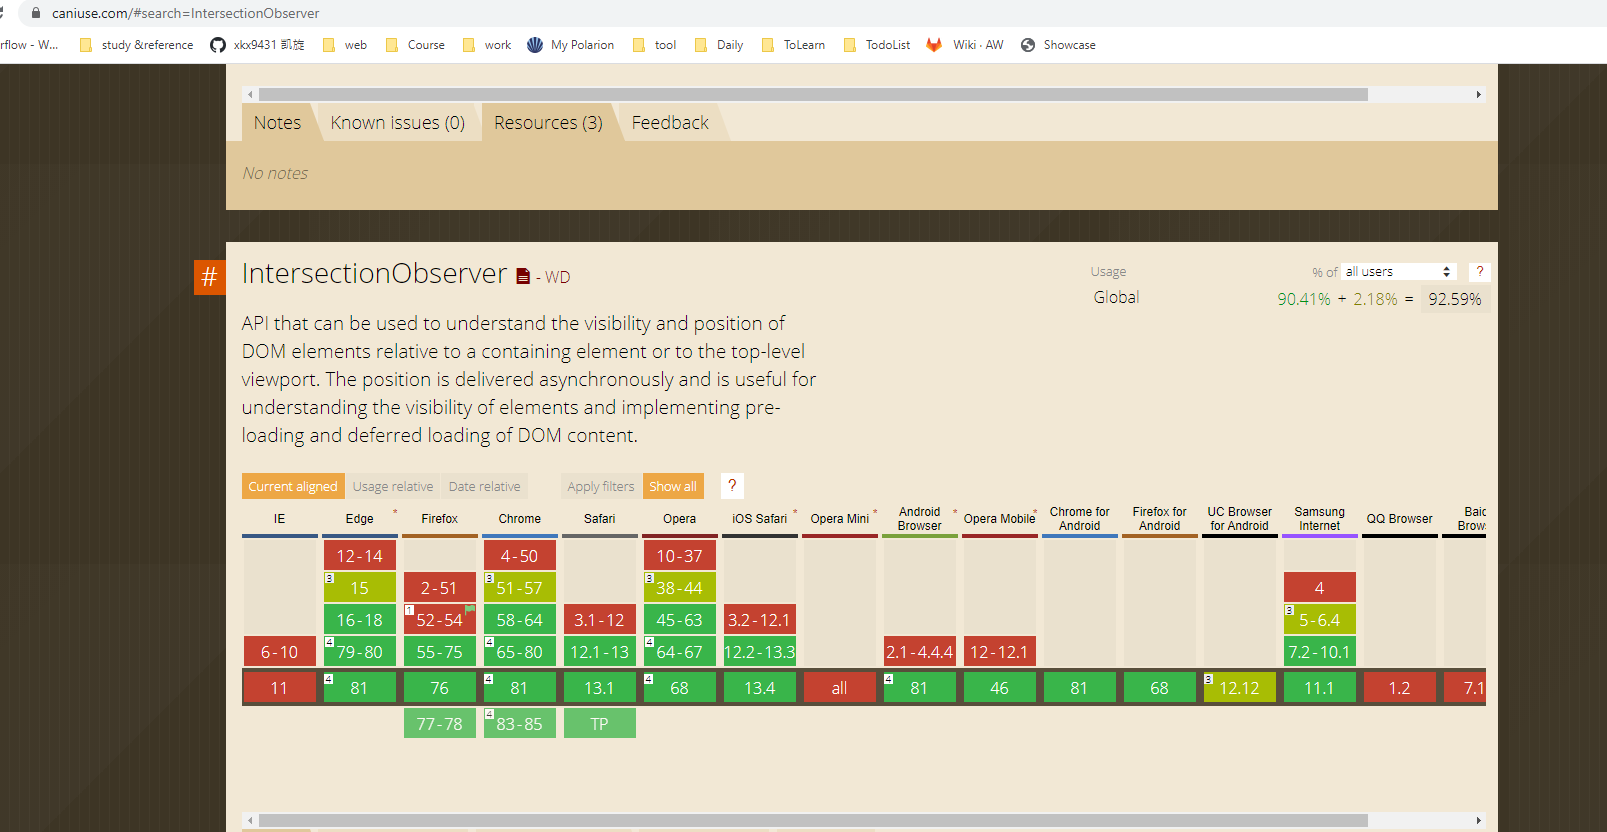
你可以在资源部分提供的链接中阅读更多关于该API的信息。
现在让我们来看看如何在一个真正的React应用中使用这个API。我们的App的最终版本将是一个无限滚动的图片页面,每个图片都会懒加载。
使用useEffect Hooks 进行API调用
要开始使用,请从这个URL中克隆一个启动项目。它有必要的设置和一些样式定义。作者还在public/index.html文件中添加了一个Bootstrap的CSS链接,对显示页面进行风格化。
如果你喜欢的话,也可以随意创建一个新项目。如果你想使用这个repo,请确保你已经安装了yarn包管理器或者npm管理器。你可以在这里找到你具体操作系统的安装说明。
在本教程中,我们将从公共API中抓取图片并在页面上显示。我们将使用Lorem Picsum APIs。
在本教程中,我们将使用端点https://picsum.photos/v2/list?page=0&limit=10,它将返回一个图片对象的数组。为了获得下一个十张图片,我们将页面的值改为1,然后改为2,以此类推。
现在我们将一步一步地构建App组件。
打开 src/App.js,输入以下代码。
import React, { useEffect, useReducer } from 'react';

import './index.css';

function App() {
  const imgReducer = (state, action) => {
    switch (action.type) {
      case 'STACK_IMAGES':
        return { ...state, images: state.images.concat(action.images) }
      case 'FETCHING_IMAGES':
        return { ...state, fetching: action.fetching }
      default:
        return state;
    }
  }
  const [imgData, imgDispatch] = useReducer(imgReducer,{ images:[], fetching: true})
  // next code block goes here
}
首先,我们定义一个reducer函数–imgReducer。这个Reducer处理两个Action。
STACK_IMAGESAction 将image数组洽接起来。FETCHING_IMAGESAction 将fetching的值在true和false之间切换。
下一步是将这个reducer连接到useReducer 钩子函数上。一旦完成该步,我们就会得到以下两样东西。
imgData,它包含两个变量:images是图片对象的数组,fetching是一个布尔值,它告诉我们API调用是否在进行中。imgDispatch,这是一个更新reducer对象的函数。 你可以在 React 文档中了解更多关于useReducer钩子函数的信息。
接下来的编码我们将进行API调用。将下面的代码粘贴到App.js中的上一个代码块下面。
// make API calls
useEffect(() => {
  imgDispatch({ type: 'FETCHING_IMAGES', fetching: true })
  fetch('https://picsum.photos/v2/list?page=0&limit=10')
    .then(data => data.json())
    .then(images => {
      imgDispatch({ type: 'STACK_IMAGES', images })
      imgDispatch({ type: 'FETCHING_IMAGES', fetching: false })
    })
    .catch(e => {
      // handle error
      imgDispatch({ type: 'FETCHING_IMAGES', fetching: false })
      return e
    })
}, [ imgDispatch ])

// next code block goes here
在useEffect钩子函数里面,我们用fetch API调用API端点。然后我们通过派发STACK_IMAGES action,使用API调用的结果更新image数组。一旦API调用完成,我们也会派发FETCHING_IMAGES action。
接下来的代码块定义了函数的返回值。在useEffect钩子函数代码块之后输入以下代码.
return (
  <div className="">
    <nav className="navbar bg-light">
      <div className="container">
        <a className="navbar-brand" href="/#">
          <h2>Infinite scroll + image lazy loading</h2>
        </a>
      </div>
    </navv
    <div id='images' className="container">
      <div className="row">
        {imgData.images.map((image, index) => {
          const { author, download_url } = image
          return (
            <div key={index} className="card">
              <div className="card-body ">
                <img
                  alt={author}
                  className="card-img-top"
                  src={download_url}
                />
              </div>
              <div className="card-footer">
                <p className="card-text text-center text-capitalize text-primary">Shot by: {author}</p>
              </div>
            </div>
          )
        })}
      </div>
    </div>
  </div>
);
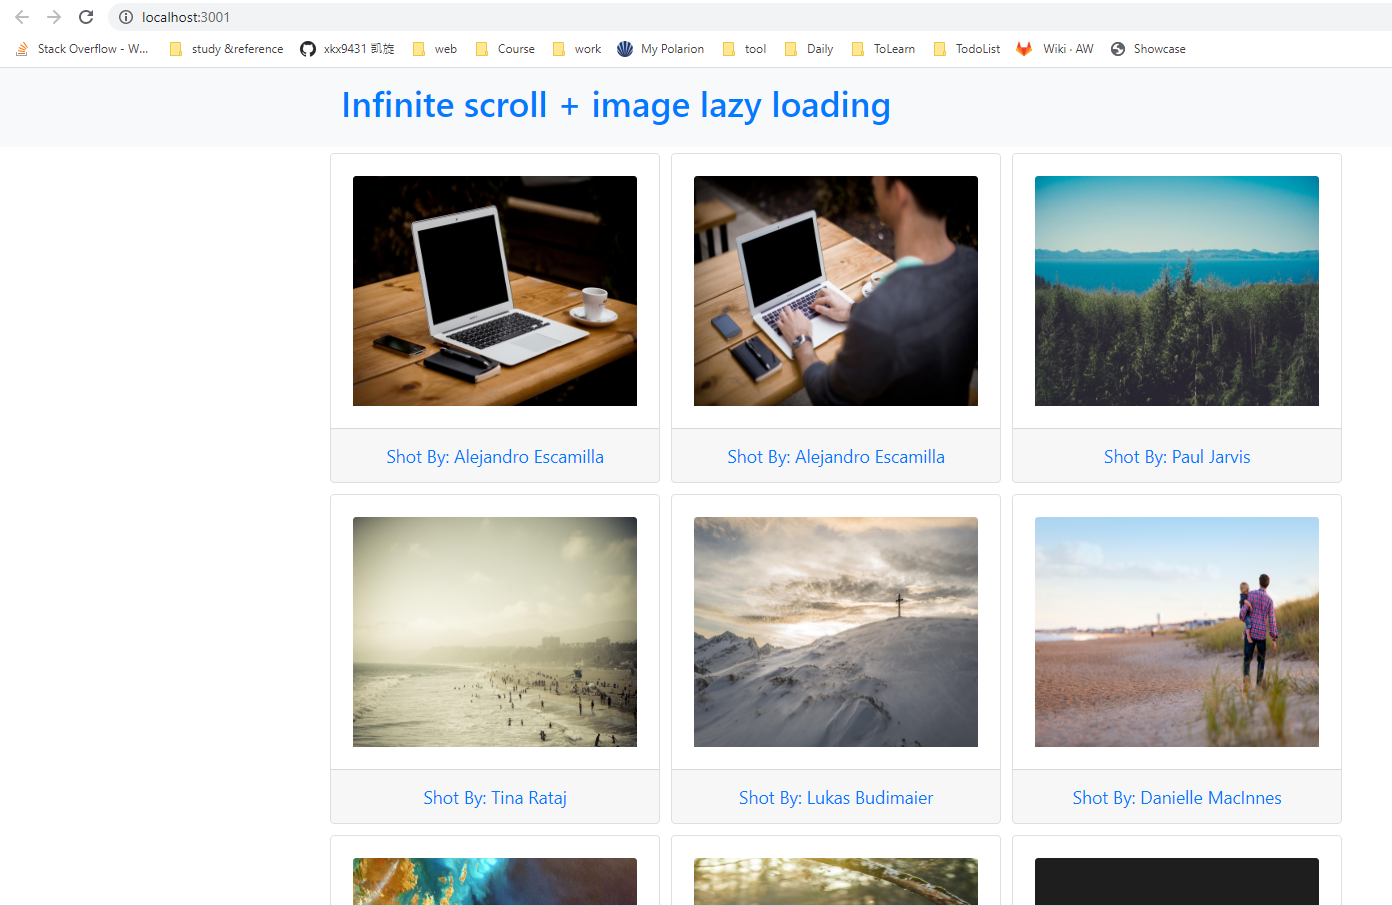
为了显示图片,我们将imgData对象中的图片数组映射显示到页面。
现在启动应用程序并在浏览器中查看页面。你应该会看到图片很好地显示在响应式网格布局中。
最后一点是导出App组件。
export default App;
此时对应的分支是 01-make-api-calls。
现在让我们通过在页面滚动时显示更多的图片来扩展。
实施无限滚动
我们的目标是随着页面的滚动而呈现更多的图片。从URL参数https://picsum.photos/v2/list?page=0&limit=10,我们知道,要获得一组新的图片,我们只需要增加页面的值就可以了。我们还也需要知道当滚动页面显示了所有的图片时候才进行请求下一页图片操作。我们知道当我们滚动网页到页面底部的时候,我们就知道我们的图片用完了。这时需要借助Intersection Observer API 来帮助我们实现这个目的。
打开 src/App.js,在 imgReducer 下面创建一个新的reducer,pageReducer。
// App.js
const imgReducer = (state, action) => {
  ...
}
const pageReducer = (state, action) => {
  switch (action.type) {
    case 'ADVANCE_PAGE':
      return { ...state, page: state.page + 1 }
    default:
      return state;
  }
}
const [ pager, pagerDispatch ] = useReducer(pageReducer, { page: 0 })
我们只定义了一个action类型。每次派发ADVANCE_PAGE action时,page的值都会增加1。
在fetch函数中更新URL,js 模板字符串动态接受页码,如下图所示。
fetch(`https://picsum.photos/v2/list?page=${pager.page}&limit=10`)
将 pager.page 添加到与imgData一致的依赖关系数组中。这样做可以确保每当 pager.page 发生变化时,该API 调用就会运行。
useEffect(() => {
...
}, [ imgDispatch, pager.page ])
在API调用的useEffect Hooks 函数之后,输入下面的代码。同时更新你的导入依赖。
// App.js
import React, { useEffect, useReducer, useCallback, useRef } from 'react';
useEffect(() => {
  ...
}, [ imgDispatch, pager.page ])

// implement infinite scrolling with intersection observer
let bottomBoundaryRef = useRef(null);
const scrollObserver = useCallback(
  node => {
    new IntersectionObserver(entries => {
      entries.forEach(en => {
        if (en.intersectionRatio > 0) {
          pagerDispatch({ type: 'ADVANCE_PAGE' });
        }
      });
    }).observe(node);
  },
  [pagerDispatch]
);
useEffect(() => {
  if (bottomBoundaryRef.current) {
    scrollObserver(bottomBoundaryRef.current);
  }
}, [scrollObserver, bottomBoundaryRef]);
我们定义一个变量bottomBoundaryRef,并将其值设置为useRef(null)。useRef可以让变量在整个组件重新渲染时保留其值,也就是说,当包含的组件重新渲染时,变量的当前值会持续存在。改变其值的唯一方法是重新分配该变量的.current属性。
在我们的例子中,bottomBoundaryRef.current的起始值为null。随着页面渲染的进行,我们将其当前属性设置为节点<div id='page-bottom-border'>。
我们使用赋值语句ref={bottomBoundaryRef}来告诉React将bottomBoundaryRef.current设置为声明此赋值的div。
因此。
bottomBoundaryRef.current = null
在渲染周期结束后,变成了
bottomBoundaryRef.current = <div id="page-bottom-boundary" style="border: 1px solid red;"></div>
我们很快就可以看到这个任务的完成情况。
接下来,我们定义一个 scrollObserver 函数,在其中设置观察者Observer。这个函数接受一个被观察的DOM节点。这里需要注意的是,每当我们有与观察区域有交集的时候,我们就会派发ADVANCE_PAGE action。一旦这个action发生,作为依赖关系的 useEffect 钩子函数就会被重新运行。这个钩子函数重新运行后,反过来,又会调用新的页码调用。
整个事件过程如下。
与观测区域产生交集 ==> 派发
ADVANCE_PAGEaction ==> 将pager.page的值增量1 ==> useEffect钩子函数执行fetch调用 ==> fetch调用执行 ==> 返回的图像数据被追加到原图像列表中。
我们在 useEffect 钩子中调用 scrollObserver,这样只有钩子函数的任何依赖关系发生变化时才会运行scrollObserver。如果我们不在useEffect钩子中调用该函数,那么该函数将在每次页面渲染时运行。
此外,bottomBoundaryRef.current指的是<div id="page-bottom-border" style="border: 1px solid red;"></div>。在将其值传递给 scrollObserver 之前,我们要检查它的值是否为null。否则,IntersectionObserver构造函数将返回一个错误。
由于我们在useEffect钩子中使用了scrollObserver,所以必须将其封装在useCallback钩子中,以防止组件无休止地重现。你可以在React文档中了解更多关于useCallback的内容。
在<div id='images'> div后输入以下代码。
// App.js
<div id='image'>
...
</div>
{imgData.fetching && (
  <div className="text-center bg-secondary m-auto p-3">
    <p className="m-0 text-white">Getting images</p>
  </div>
)}
<div id='page-bottom-boundary' style= ref={bottomBoundaryRef}></div>
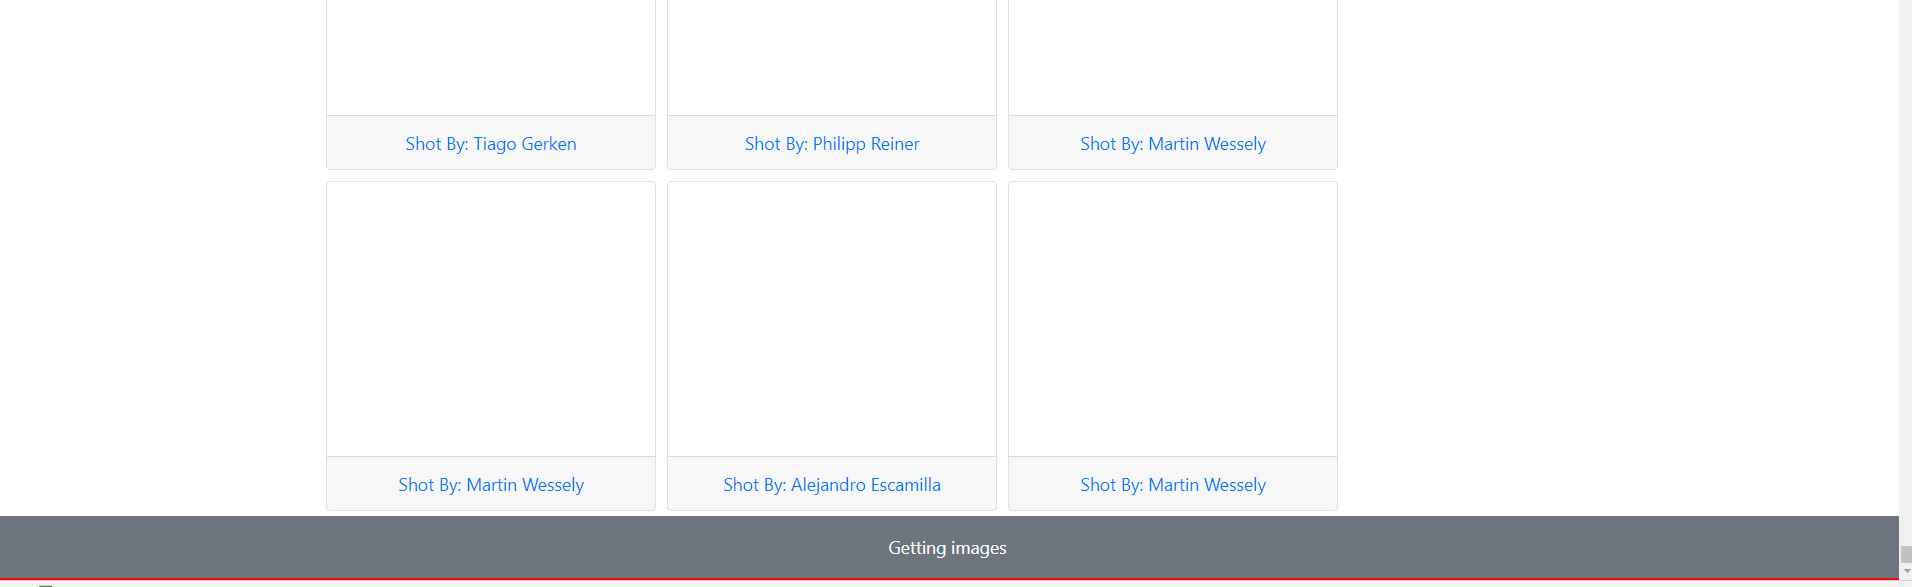
当 API 调用开始时,我们将 fetching 设置为 true,文本 Getting images 就会变得可见。当它完成后,我们将fetching设置为false,文本就会被隐藏。我们还可以在构造函数选项对象中设置不同的阈值来触发API调用,然后再准确地击中边界。最后的红线可以让我们准确地看到当我们击中页面边界的时候。
下面我们就来实现图片的懒加载。
实现图片的懒加载
如果你在向下滚动时同时检查网络选项卡,你会发现,只要你点击红线(底部边界),API调用就会发生,即使你还没有看到它们,所有的图片都会开始加载。有各种原因会导致这种行为不可取。理想情况是我们先把网络调用保存下来,直到用户想看图片的时候再进行。在这种情况下,我们可以选择懒加载图像,也就是说,我们不会加载图像,直到它滚动到视图中才加载。
打开src/App.js。就在无限滚动函数下面,输入下面的代码。
// App.js

// lazy loads images with intersection observer
// only swap out the image source if the new url exists
const imagesRef = useRef(null);
const imgObserver = useCallback(node => {
  const intObs = new IntersectionObserver(entries => {
    entries.forEach(en => {
      if (en.intersectionRatio > 0) {
        const currentImg = en.target;
        const newImgSrc = currentImg.dataset.src;
        // only swap out the image source if the new url exists
        if (!newImgSrc) {
          console.error('Image source is invalid');
        } else {
          currentImg.src = newImgSrc;
        }
        intObs.unobserve(node); // detach the observer when done
      }
    });
  })
  intObs.observe(node);
}, []);
useEffect(() => {
  imagesRef.current = document.querySelectorAll('.card-img-top');
  if (imagesRef.current) {
    imagesRef.current.forEach(img => imgObserver(img));
  }
}, [imgObserver, imagesRef, imgData.images]);
与 scrollObserver 一样,我们定义了一个函数 imgObserver,接受一个节点来用来监视。当页面产生一个交集时,如en.intersectionRatio > 0所决定的那样,我们将交换该元素上的图像源。注意,我们应当首先检查新的图像源是否存在,然后再进行交换。和 scrollObserver 函数一样,我们将 imgObserver 包裹在 useCallback 钩子中,以防止无休止的组件重现。
另外要注意的是,一旦我们完成了替换之后,我们就停止观察一个 img 元素。我们用unobserve方法来完成。
在下面的 useEffect 钩子中,我们用 document.querySelectorAll 抓取页面上所有的.card-img-top 类的图片。然后我们对每个图片进行迭代,并在上面设置一个imgObserver。
注意,我们将
imgData.imgData.images作为useEffect钩子的一个依赖关系添加了。当这个变化时,它会触发useEffect钩子,然后依次调用imgObserver,每个<img className='card-img-top'>元素。
更新<img className='card-img-top'/>元素,如下所示。
<img
  alt={author}
  data-src={download_url}
  className="card-img-top"
  src={'https://picsum.photos/id/870/300/300?grayscale&blur=2'}
/>
我们为每一个<img className='card-img-top'/>元素设置一个默认源,并将我们要显示的图片存储在data-src属性中。默认的图片通常有一个小的尺寸,这样我们在下载的时候就会尽量减少。当<img/>元素出现在视图中时,data-src属性上的值会取代默认图片。
在下面的图片中,我们看到默认的灯塔图片仍然显示在部分空间中。

这时对应的分支是03-lazy-loading。
接下来我们看看如何把这些函数都抽象化,让它们都能重用。
抽象 Fetch, Infinite Scroll And Lazy Loading 到自定义Hooks中
我们已经成功地实现了fetch、无限滚动和图片懒加载等功能。我们的应用程序中可能有另一个组件需要类似的功能。在这种情况下,我们可以将这些功能抽象化并重用。我们所要做的就是将它们移动到一个单独的文件中,然后将它们导入到我们需要的地方。我们要把它们变成自定义钩子。
React 文档将 Custom Hook 定义为一个名称以 "use"开头的 JavaScript 函数,它可以调用其他钩子。在我们的例子中,我们要创建三个钩子,useFetch、useInfiniteScroll、useLazyLoading。
在src/文件夹里面创建一个文件。把它命名为customHooks.js,然后把下面的代码粘贴到里面。
// customHooks.js

import { useEffect, useCallback, useRef } from 'react';
// make API calls and pass the returned data via dispatch
export const useFetch = (data, dispatch) => {
  useEffect(() => {
    dispatch({ type: 'FETCHING_IMAGES', fetching: true });
    fetch(`https://picsum.photos/v2/list?page=${data.page}&limit=10`)
      .then(data => data.json())
      .then(images => {
        dispatch({ type: 'STACK_IMAGES', images });
        dispatch({ type: 'FETCHING_IMAGES', fetching: false });
      })
      .catch(e => {
        dispatch({ type: 'FETCHING_IMAGES', fetching: false });
        return e;
      })
  }, [dispatch, data.page])
}

// next code block here
useFetch钩子接受一个dispatch函数和一个data对象。dispatch函数将API调用的数据传递给App组件,而data对象则让我们更新API端点URL。
// infinite scrolling with intersection observer
export const useInfiniteScroll = (scrollRef, dispatch) => {
  const scrollObserver = useCallback(
    node => {
      new IntersectionObserver(entries => {
        entries.forEach(en => {
          if (en.intersectionRatio > 0) {
            dispatch({ type: 'ADVANCE_PAGE' });
          }
        });
      }).observe(node);
    },
    [dispatch]
  );
  useEffect(() => {
    if (scrollRef.current) {
      scrollObserver(scrollRef.current);
    }
  }, [scrollObserver, scrollRef]);
}

// next code block here
useInfiniteScroll 钩子接受一个 scrollRef 和一个 dispatch 函数。scrollRef可以帮助我们设置观察器observer,在我们实现它的章节中已经讨论过了。dispatch函数提供了一种方法来触发更新API端点URL中的页码的action动作。
// lazy load images with intersection observer
export const useLazyLoading = (imgSelector, items) => {
  const imgObserver = useCallback(node => {
  const intObs = new IntersectionObserver(entries => {
    entries.forEach(en => {
      if (en.intersectionRatio > 0) {
        const currentImg = en.target;
        const newImgSrc = currentImg.dataset.src;
        // only swap out the image source if the new url exists
        if (!newImgSrc) {
          console.error('Image source is invalid');
        } else {
          currentImg.src = newImgSrc;
        }
        intObs.unobserve(node); // detach the observer when done
      }
    });
  })
  intObs.observe(node);
  }, []);
  const imagesRef = useRef(null);
  useEffect(() => {
    imagesRef.current = document.querySelectorAll(imgSelector);
    if (imagesRef.current) {
      imagesRef.current.forEach(img => imgObserver(img));
    }
  }, [imgObserver, imagesRef, imgSelector, items])
}
使用LazyLoading钩子接收一个选择器和一个数组。选择器是用来查找图像的。数组中的任何变化都会触发useEffect钩子,在每个图像上设置观察器。
可以看到,这和我们在src/App.js中的函数是一样的,我们将其解压到一个新文件中。现在的好处是,我们可以动态地传递参数。现在让我们在App组件中使用这些自定义钩子。
打开 src/App.js。导入自定义钩子,删除我们定义的获取数据、无限滚动和图片懒加载的函数。保留reducer和我们使用useReducer的部分。贴上下面的代码。
// App.js

// import custom hooks
import { useFetch, useInfiniteScroll, useLazyLoading } from './customHooks'

  const imgReducer = (state, action) => { ... } // retain this
  const pageReducer = (state, action) => { ... } // retain this
  const [pager, pagerDispatch] = useReducer(pageReducer, { page: 0 }) // retain this
  const [imgData, imgDispatch] = useReducer(imgReducer,{ images:[], fetching: true }) // retain this

let bottomBoundaryRef = useRef(null);
useFetch(pager, imgDispatch);
useLazyLoading('.card-img-top', imgData.images)
useInfiniteScroll(bottomBoundaryRef, pagerDispatch);

// retain the return block
return (
  ...
)
我们在无限滚动的章节中已经讲到了BottomBoundaryRef。我们将pager对象和imgDispatch函数传递给useFetch。 useLazyLoading接受类名为.card-img-top选择器。注意选择器包含的’.’。通过这样做,我们不需要特别的指定它为 document.querySelectorAll。useInfiniteScroll Hook既接受 ref,也接受用于递增页面值的 dispatch 函数。
此章节对应的分支是04-custom-hooks。
结论
HTML一直不断的提供有用的API 来实现很酷的功能。在这篇文章中,我们已经看到了在React功能组件中使用交集观察器( intersection observer )是多么容易。在这个过程中,我们学习了如何使用React的一些钩子,以及如何编写自己的钩子。
参考资料:
- “Infinite Scroll + Image Lazy Loading,” Orji Chidi Matthew, GitHub
- “Infinite Scrolling, Pagination Or “Load More” Buttons? Usability Findings In eCommerce,” Christian Holst, Smashing Magazine
- “Lorem Picsum,” David Marby & Nijiko Yonskai
- “IntersectionObserver’s Coming Into View,” Surma, Web Fundamentals
- Can I Use…IntersectionObserver
- “Intersection Observer API,” MDN web docs
- “Components And Props,” React
- “useCallback,” React
- “useReducer,” React