NodeJs != JavaScript
refer from jscomplete.com, author Samer Buna
nodejs is popular, and nowadays it can work in Server side framework,Mobiles and IoT also can devlop Desktop applications And there are millions of users, nodejs has a largest ecosystem. It’s worth to learn some nodejs, not the package api but something in runtime.
Node is the full-stack language, and famous with it’s Non-blocking framework, and single-thread.
Node’s Architecture: V8 and libuv
The two most important players in Node’s architecture are V8 and libuv. Node’s default VM is V8.
https://nodejs.dev/learn/the-v8-javascript-engine V8 is the name of the JavaScript engine that powers Google Chrome. It’s the thing that takes our JavaScript and executes it while browsing with Chrome. V8 provides the runtime environment in which JavaScript executes. The DOM, and the other Web Platform APIs are provided by the browser.
in cmd, press the node -v or node -p 'process.versions.v8' you can see the v8 verison.
such as
node -p process.verisons.v8
>> '7.8.279.23-node.45'
 Node is more than a wrapper for V8, it provides APIs for working with operating system files, binary data, networking and much more. It’s useful to understand how V8 and Node interact and work together. First, Node uses V8 via V8’s C++ API. Node itself has an API which we can use in JavaScript, and it allows us to interact with the filesystem, network, timers, and others. The Node API eventually executes C++ code using V8 object and function templates, but it’s not part of V8 itself. Node also handles the waiting for asynchronous events for us using libuv. When Node is done waiting for I/O operations or timers, it usually has callback functions to invoke, and when it’s time to invoke these callbacks, Node simply passes the control into the V8 engine. When V8 is done with the code in the callback, the control is passed back to Node. This is important to understand as when the control is with V8 and since V8 is single-threaded, Node cannot execute anymore JavaScript code, no matter how many callbacks have been registered, Node will wait until V8 can handle more operations. This is actually what makes programming in Node easy. We don’t have to worry about locking or race conditions. There’s only one thread where our JavaScript code runs. Libuv is a C library developed for Node, but it’s now used by languages like Rust, Julia, and others. It’s used to abstract the non-blocking I/O operations to a consistent interface across many operating systems. It’s what handles operations on the file system, TCP/UDP sockets, child processes, and others. Libuv includes a thread pool to handle what can’t be done asynchronously at the operating system level. Libuv is also what provides Node with the event-loop, will dive into later. Other than V8 and Libuv, Node has a few more dependencies that we should talk about: http-parser is a small C library for parsing HTTP messages. It works for both requests and responses and it’s designed to have a very small pre-request memory footprint. HTTP requests and responses will also dive into later. C-ares is what enables performing asynchronous DNS queries. OpenSSL is used mostly in the tls and crypto modules. It provides implementations for many cryptographic functions. Zlib is used for its fast async and streaming compression and decompression interfaces.
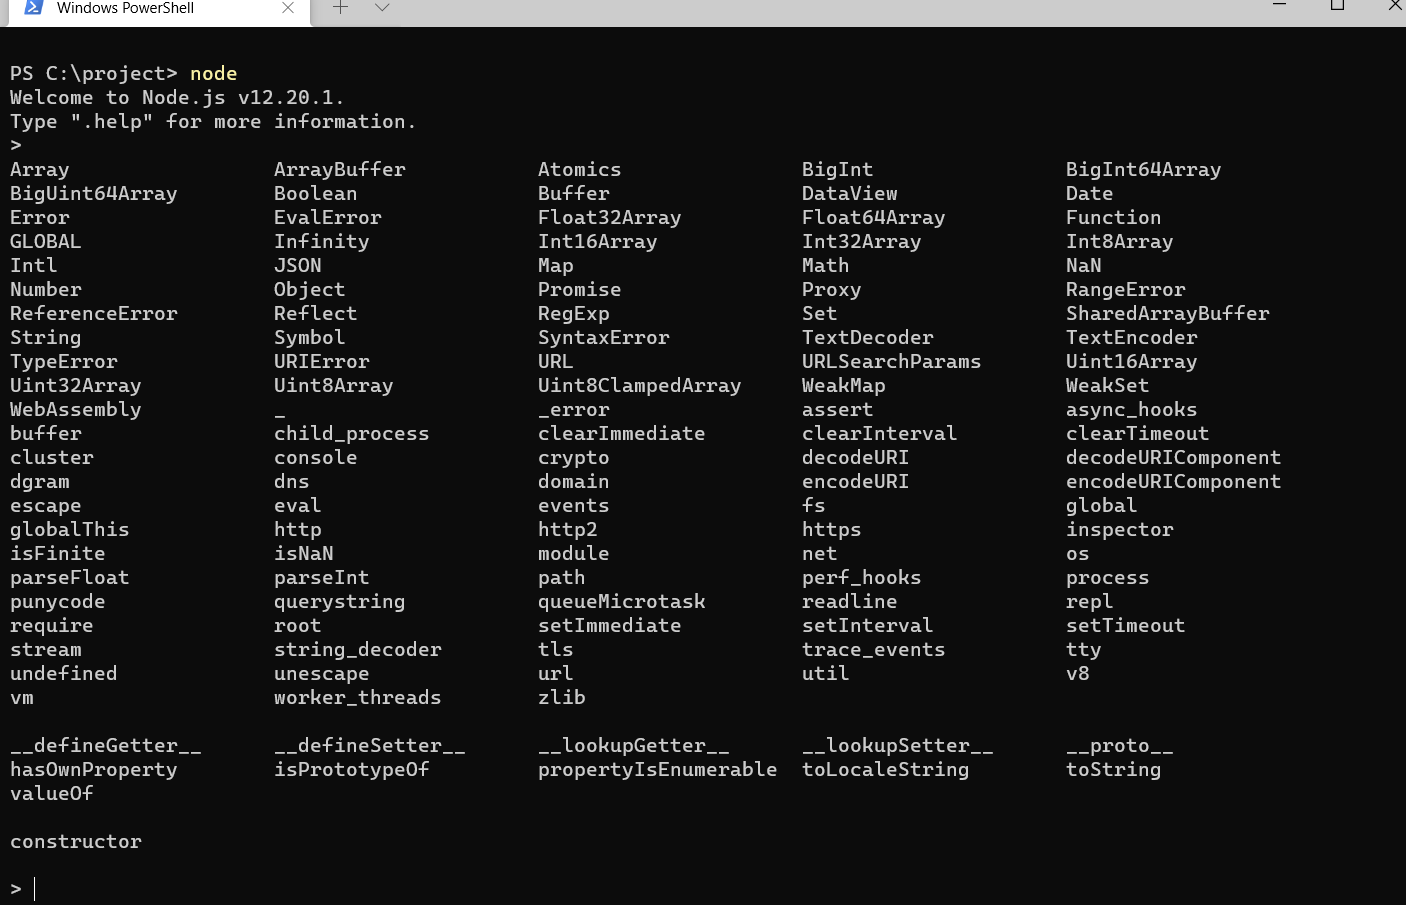
Node’s CLI and REPL
Node. js comes with a variety of CLI options. These options expose built-in debugging, multiple ways to execute scripts, and other helpful runtime options. Running the Node command without arguments starts a REPL (Read, Eval, Print, Loop).
One of the most useful features of Node’s REPL is the auto-complete. If you just tab-tab on an empty line, you get this big list, which is equivalent to tabbing on the global object. Node’s REPL remembers the lines you previously tested and you can navigate to them with the up/down arrow.
Global Object, Process, and Buffer
- global The one and only true global object in Node is alled global. When we declare top-level variables in Node, like the answer variable here, that answer variable is local to the util. js file, and we can’t access it from other files, even after requiring the util. js module. However, when we define answer on the global object, the index file, which requires the util. js module, can now access that globally declared variable. It goes without saying that we should try to avoid defining things on the global object at any cost, but it helps to understand all the built in properties defined on the global object.
sample:
    // will not console
    // util.js
    var ans = "this can be shared"
    // index.js
    require('util.js')
    console.log(ans) // undefined

    **********************
      // util.js
    globa.ans = "this can be shared"
    // index.js
    require('util.js')
    console.log(ans) // "this can be shared"
-
process
The node process object provides a bridge between a Node application and its running environment. It has many useful properties. We can use
process.versionsto read versions of the current node and its dependencies. We can use these version numbers to determine if we should run some custom code. For example, maybe for an older version of v8. One of the most useful properties on the process object is the env property. The env property exposes a copy of the user environment (which is the list of strings you get with the ENV command in Linux machines and the SET command in Window). The word copy here is key. If we modify process. env, which we can actually do, we won’t be modifying the actual user environment, so keep that in mind. You should actually not read fromprocess.envdirectly, we usually use configuration variables like passwords or API keys from the environment. Also which ports to listen to, which database uris to connect to. You should put all of these behind a configuration or settings module, and always read from that module, notprocess.envdirectly.The process object is an instance of EventEmitter. This means we can emit events from process and we listen to certain events on the process. On exit is emitted when Node’s event loop has nothing else to do, or when a manual call to process. exist has been executed. We can’t stop the node process from exiting here, but maybe we can log this somewhere, or send an alert that this particular process is gone and maybe someone should do something about it. However, we can only do synchronous operations inside this event handler, we can’t use the event loop here. One other usually misused event on the process is the uncaughtException event, which is emitted whenever a JavaScript exception is not handled and it bubbles all the way to the event loop. In that case, and by default, Node will print the stack trace and exit. Unlike the exit event though, if we register a handler on the uncaughtException, Node will not exit, and this is bad and unpredictable in some cases, so you should avoid doing this interrupt and let the process exit. You can use another monitor process to restart the exiting process if needed.When the process exits, the exit event handler will be invoked.
sample:
    // process is an event emitter

    process.on('exit', (code) => {
    // do one final synchronous operation
    // before the node process terminates

    console.log(`About to exit with code: ${code}`);
    });

    process.on('uncaughtException', (err) => {
    // something went unhandled.
    // Do any cleanup and exit anyway!

    console.error(err); // don't do just that.

    // FORCE exit the process too.
    process.exit(1);
    });

    // keep the event loop busy
    process.stdin.resume();

    // trigger a TypeError exception
    console.dog();

    // About to exit with code: 1
    //  TypeError: console.dog is not a function
    // Process exited with code 1
Buffer
The Buffer class, also available on the global object, is used heavily in Node to work with binary streams of data. A buffer is essentially a chunk of memory allocated outside of the V8 heap, and we can put some data in that memory, and that data can be interpreted in one of many ways, depending on the length of a character, for example. That’s why when there is a buffer, there is a character encoding, because whatever we place in a Buffer does not have any character encoding, so to read it, we need to specify an encoding. When we read content from files or sockets, if we don’t specify an encoding, we get back a buffer object. So a buffer is lower-level data structure to represent a sequence of binary data, and unlike arrays, once a buffer is allocated, it cannot be resized.
We can create a buffer in one of three major ways: Alloc creates a filled buffer of certain size, while allocUnsafe will not fill the created buffer. So that might contain old or sensitive data, and need to be filled right away. To fill a buffer we can use buffer.fill(). Just like arrays and strings, on buffers we can use operations like, includes, indexOf, and slice, but there are some differences with these methods when we use them on buffers. For example, when we do a slice operation on buffers,the sliced buffer shares the same memory with the original buffer.
sample below case will output last chracter XYZ => XBC
const fs = require('fs');

const conversionMap = {
  '88': '65',
  '89': '66',
  '90': '67',
};

fs.readFile(__filename, (err, buffer) => {
  let tag = buffer.slice(-4, -1);

  for(let i=0;i < tag.length; i++) {
    tag[i] = conversionMap[tag[i]];
  }

  console.log(buffer.toString());
});

// TAG: XYZ
One final note on buffers, when converting streams of binary data, we should use the string_decoder module, because it handles multi-byte characters much better, especially incomplete multibyte characters. The string decoder preserves the incomplete encoded characters internally until it’s complete and then returns the result. The default toString operation on a buffer does not do that. Let me explain this with an example. Say we have a binary input coming from somewhere and we want to encode it into UTF8 characters. We’re receiving this input incrementally. For a simulation, I’ll type bytes into the standard in stream, and this code will read what it gets, puts it in a buffer, and then tries to print it with both toString method and the string decoder. write method. Very simple. Now I’m going to feed the script 3 utf-8 encoded bytes, which represent the euro symbol. But you’ll notice after every input, toString method is clueless, while the string decoder is smartly trying to make sense of the input. When it discovers that what we entered so far is actually a euro symbol, it outputs that. So in general, if you’re receiving UTF-8 bytes as chunks in a stream, you should always use StringDecoder.
    const { StringDecoder } = require('string_decoder');
    const decoder = new StringDecoder('utf8');

    process.stdin.on('readable', () => {
    const chunk = process.stdin.read();
    if (chunk != null) {
        const buffer = Buffer.from([chunk]);
        console.log('With .toString():', buffer.toString());
        console.log('With StringDecoder:', decoder.write(buffer));
    }
    });

// 0xE2, 0x82, 0xAC -> €
How require() Actually Works
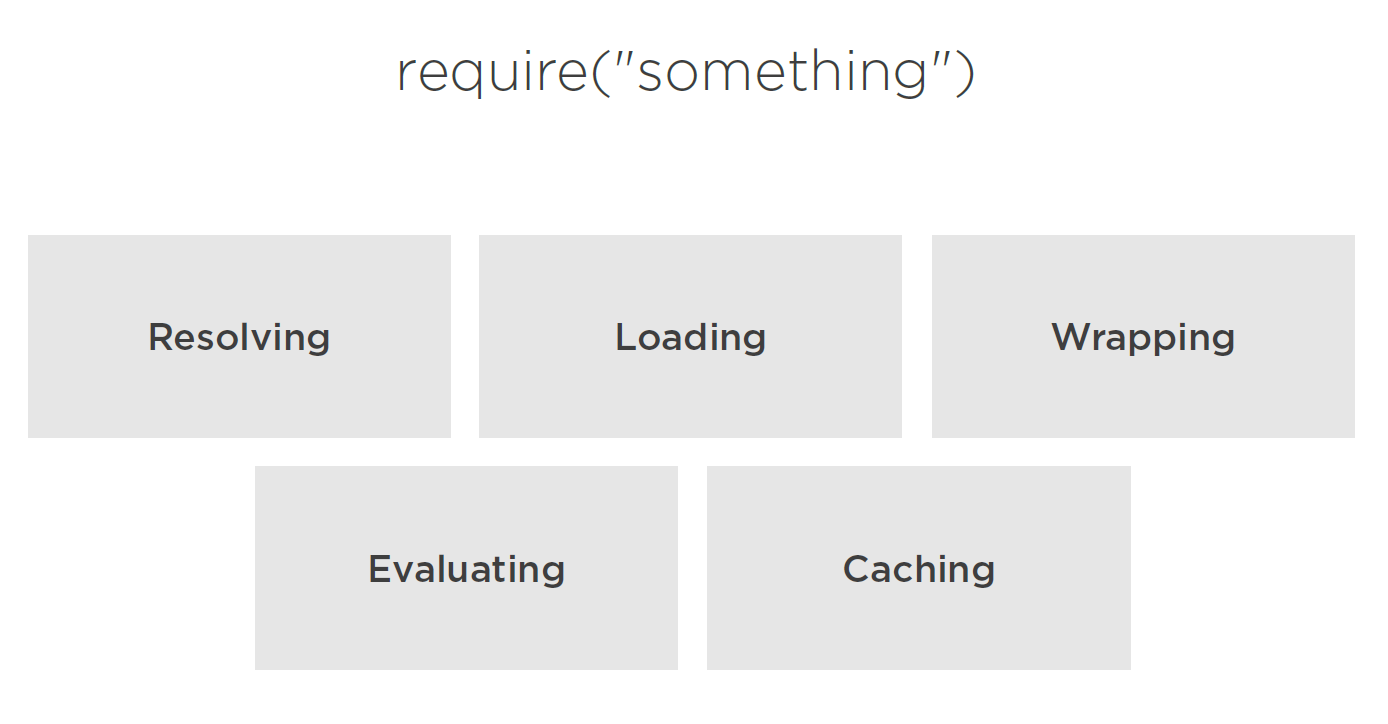
Modularity is a first class concept in Node, and fully understanding how it works is a must. There are two core modules involved, the require function, which is available on the global object, but each module gets its own require function, and The Module module, also available on the global object, and is used to manage all the modules we require with the require function. Requiring a module in node is a very simple concept, to execute a require call, Node goes through the following sequence of steps: Resolving, to find the absolute file path of a module. Loading, is determined by the content of the file at the resolved path. Wrapping, is what gives every module it’s private scope, and what makes require local to every module. Evaluating is what the VM eventually does with the code. And then, Caching, so that when we require this module again, we don’t go over all the steps again. We’ll talk about every step in more detail in below pics.
module object has some interesting properties.First, an id to identify it. The full path to the module file is usually used here, except for this root module, a. is used instead. The path to the filename can be accessed with the filename property. Node Modules have a one-to-one relation with files on the file-system. We require a module by loading the content of a file into memory. However, before we can load the content of a file into the memory, we need to find the location of a file. For example, if we require a “find-me” module from the index module, Node will look for find-me. js in these paths, which start from the current directory and go up all the way to the root directory. If it can’t find find-me. js in any of these paths, it will throw a cannot find module error. To be exact, Node will actually look for the find-me. js in more folders,
// Extra paths:
// $HOME/.node_modules
// $HOME/.node_libraries
// $PREFIX/lib/node
but those are supported for mostly historic reasons and using them is no longer recommended. Also, core node modules are an exception here. The resolve step returns immediately for core modules.
For non-core modules:
- find from the require path, also we can specific some logic in
package.jsonbymainproperty such as below, and it will resolve this file.{ "name" : "your export name", "main" : "some your *.js file" }
Also, if we want to only resolve the module and not execute it, we can use require. resolve method. This behaves exactly the same as require, but does not load the file. It will still throw an error if the file does not exist. This can be used, for example, to check whether an optional package is installed or not. Modules don’t have to be files. We can also create a find-me folder under node_modules and place an index. js file in there. And when we require that module, it will actually load the index file under node_modules. Other than resolving modules from within the node_modules folder, we can also place the module anywhere we want and require it with either relative paths,. / and.. /, or with absolute paths.
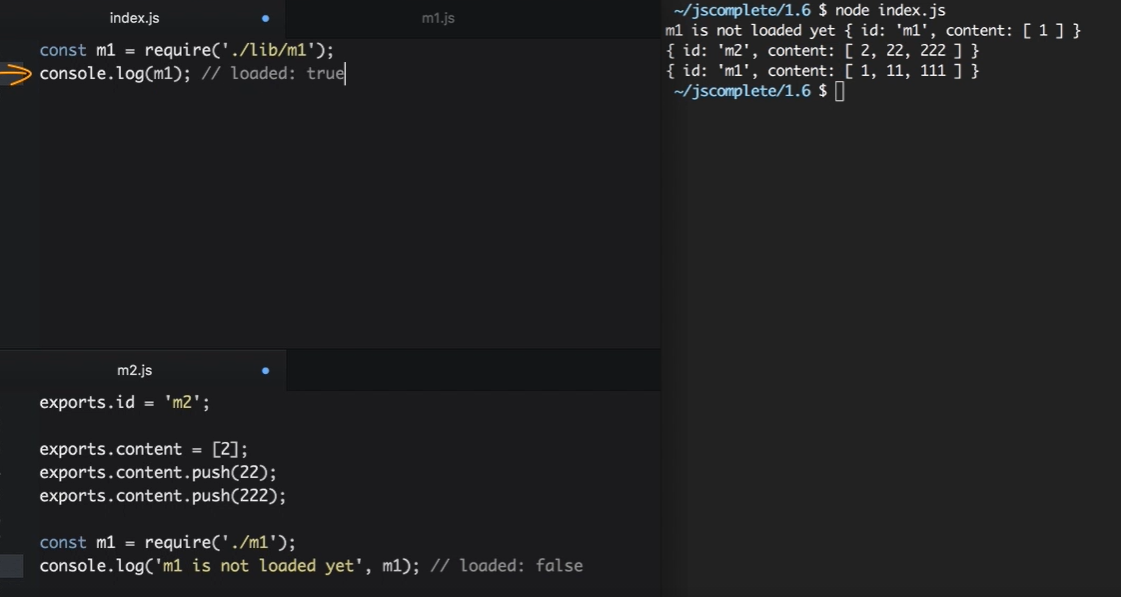
circular modular dependency
this is supported in node, and will be resolved in loaded flag. Such as you has below folder stuctures:
// folders
// lib\m1.js
// lib\m2.js
// index.js


//m1.js
exports.id = 'm1';

exports.content = [1];
const m2 = require('./m2');
console.log(m2);

exports.content.push(11);
exports.content.push(111);

//m2.js
exports.id = 'm2';

exports.content = [2];
exports.content.push(22);
exports.content.push(222);

const m1 = require('./m1');
console.log('m1 is not loaded yet', m1);

//index.js
// console.log(module);
// Circular module
const m1 = require('./lib/m1');
console.log(m1);
Node will partially print m1 here. At this point of the lifecycle of m2, the m1 module is not ready yet, it still has 2 more lines to be processed, but Node was able to share a partial exports object from m1 to m2. In terms of the loaded attribute, in this line in m2, the m1 module had a loaded false attribute, while in this line of the index file, the m1 module has a loaded true attribute.
JSON and C++ Addons
We can define and require JSON files, and C++ Addon files with the node require function. The first thing Node will try to resolve is a. js file. If it can’t find a. js file, it will try a. json file and it will parse the file if found as a JSON text file. After that, it will try to find a binary. node file. Let’s see examples for those extra extensions. If we have under node modules a data. json file, and we have some valid JSON data in there, then we can require data in here, and Node will parse the content of data. json into our data constant. This is useful when, for example, all you need to export is some static configuration data. You can simply put that in a config. json file and just require that.
If Node can’t find a. js or a. json file, it will look for a. node file and it would interpret the file as a compiled addon module.
Create an addon-src directory, and place hello. cc in there, and then on that same level, copy this build configuration into a binding. gyp file. This simply tells the compiler which file to compile and what target name to use for the compiled module. Then, to compile, we need the node-gyp package, so install that, and once we have it, from within the addon-src folder, we run node-gyp configure, which will create the make files under a build directory. We then run node-gyp build, and that should create the binary compiled addon. node file. This is the file that we can require. I’ll copy it under the local node_modules folder, and now our require script here should work. This is the output we’ve seen in the C++ code.
|   config.json
|   index.js
|
\---addon-src
        binding.gyp
        hello.cc
// addon-src\binding.gyp
{
  "targets": [
    {
      "target_name": "addon",
      "sources": [ "hello.cc" ]
    }
  ]
}
// hello.cc
#include <node.h>

namespace demo {

using v8::FunctionCallbackInfo;
using v8::Isolate;
using v8::Local;
using v8::Object;
using v8::String;
using v8::Value;

void Method(const FunctionCallbackInfo<Value>& args) {
  Isolate* isolate = args.GetIsolate();
  args.GetReturnValue().Set(String::NewFromUtf8(isolate, "world"));
}

void init(Local<Object> exports) {
  NODE_SET_METHOD(exports, "hello", Method);
}

NODE_MODULE(addon, init)

}  // namespace demo
const addon = require('addon');

console.log(addon.hello());
We can actually see the support of these three extensions by looking at require. extensions. These are the actual functions that get executed. For example, for a.js file, node just compiles the content, while for a .json it uses JSON. parse on the content. For a .node file, it uses process dlopen.
  >  require. extensions
  [Object: null prototype] {
    '.js': [Function],
    '.json': [Function],
    '.node': [Function]
  }
  > require. extensions[ '.js' ]. toString()

  function(module, filename) {\r\n' +
    "  if (filename.endsWith('.js')) {\r\n" +
      .....
Wrapping and Caching Modules
Wrapping
Node’s wrapping of modules is often misunderstood. To explain them, let me start by asking an important question. We can use the export object to export properties, but we cannot replace the export object directly. When we need to replace the export object, we need to use the module. exports syntax. The question is… why? Also, we’ve seen how the variables we define in the module scope here will not be available outside the module. Only the things that we export are available. So how come the variables are magically scoped and the exports object can’t be replaced directly? The answer is simple.
Before compiling a module, Node wraps the module code in a function, which we can inspect using the wrapper property of the module module. This function has 5 arguments: exports, require, module, __filename, and __dirname.
# node repl
> require('module').wrapper
Proxy [
  [
    '(function (exports, require, module, __filename, __dirname) { ',
    '\n});'
  ],
  { set: [Function: set], defineProperty: [Function: defineProperty] }
]
also you can try node index.js with content console.log(arguments).
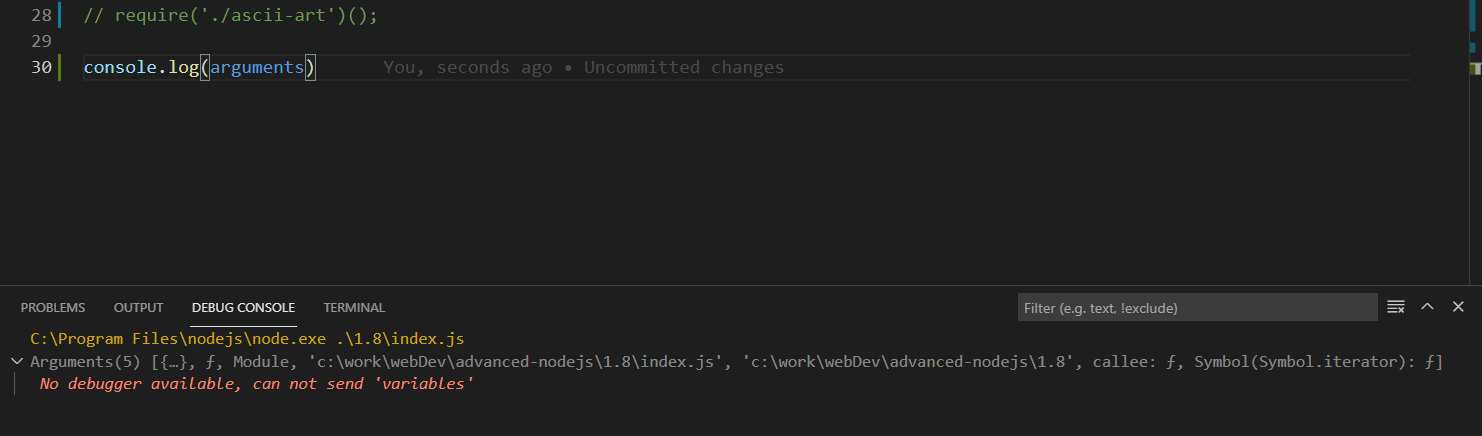
Note how both the require object and the module object are the copies associated with this index file. They are not global variables. The wrapping functions return value is this exports object reference. Note how we have both exports and the module object itself passed in the wrapper function. Exports is simply a variable reference to module. exports, so what happens here is equivalent to doing this line at the top of the module. So we can change the properties of the exports object, but if we change the whole export object, it would no longer be a reference to module. exports. This is the way JavaScript reference objects work everywhere, not just in this context. There is nothing special about require. It’s a function that takes a module name or path and returns the exports object. We can simply override the require function to do our own logic if we want to. Say, for example, for testing purposes, we want every require line to be mocked by default and just returns an empty object instead of the required module exports object. This simple reassignment of require will do the trick, and if we test that by requiring any module and console. logging that module, we’ll get the mocked object by default.
require = function() {
  return { mocked: true };
};

const fs = require('fs');
console.log(fs); // { mocked: true }
Also we can using module.main to determine if this is a required script or main functions.Such as using require a printStars
// index.js
const printStars = require('./printStars');
printStars(10, 'Hi!');
const print = (stars, header) => {
  console.log('*'.repeat(stars));
  console.log(header);
  console.log('*'.repeat(stars));
};

if (require.main == module) {
  // Running as a script
  print(process.argv[2], process.argv[3]);
} else {
  // Being required
  module.exports = print;
}
then in node repl
> node 1.8\printStars.js 5 hello
*****
hello
*****
> node 1.8\index.js
**********
Hi!
**********
caching
Caching is important to understand. Here’s is a simple example to demonstrate it. Say that we have this ascii-art file that prints a cool looking header, and we want to display this header every time we require the file. So if we require this line twice, we want the header to show up twice. But because of module’s caching, that’s not going to happen. Node caches the first call and does not load the file on the second call.
//index.js
require('./ascii-art')
require('./ascii-art')

// ascii-art.js
console.log(`
    _ __   __   __   , _ __     _,   __
   ( /  ) ( /  ( /  / ( /  )   / |  ( /
    /--'   /    /  /   /--<   /--|   /
   /     (/___/(_,/_  /   \__/   |_(/___/
     __,  ___    ,___ __    ______
    (    ( /    /   /( /  /(  /
     \`.   /    /  __  /--/   /
   (___)_/_   (___/  /  /_ _/
  `);
node index.js
# only one time
    _ __   __   __   , _ __     _,   __
   ( /  ) ( /  ( /  / ( /  )   / |  ( /
    /--'   /    /  /   /--<   /--|   /
   /     (/___/(_,/_  /   \__/   |_(/___/
     __,  ___    ,___ __    ______
    (    ( /    /   /( /  /(  /
     \`.   /    /  __  /--/   /
   (___)_/_   (___/  /  /_ _/
We can see the cache using require.cache, and in there you will find an entry for the ascii-art file. Those entries are indexed by the full file path. We can actually remove the cache entry here if we want to, using this full file path, and Node will re-load the module fine after that. But this is not the most efficient solution for this problem. The simple solution for this case is to wrap the log line here in a function, and exports that instead. Then when we require the file, we just execute the exports object as a function, and every time we do so, the function will execute the console. log statement.
require('./ascii-art')();
// console.log(require.cache);
// delete require.cache['full path to /ascii-art.js']

require('./ascii-art')();

// ascii-art.js
module.exports = () => {
  console.log(`
    _ __   __   __   , _ __     _,   __
   ( /  ) ( /  ( /  / ( /  )   / |  ( /
    /--'   /    /  /   /--<   /--|   /
   /     (/___/(_,/_  /   \__/   |_(/___/
     __,  ___    ,___ __    ______
    (    ( /    /   /( /  /(  /
     \`.   /    /  __  /--/   /
   (___)_/_   (___/  /  /_ _/
  `);
};
    `_ __   __   __   , _ __     _,   __
   ( /  ) ( /  ( /  / ( /  )   / |  ( /
    /--'   /    /  /   /--<   /--|   /
   /     (/___/(_,/_  /   \__/   |_(/___/
     __,  ___    ,___ __    ______
    (    ( /    /   /( /  /(  /
     \.   /    /  __  /--/   /
   (___)_/_   (___/  /  /_ _/

  __   __   __   , _ __     _,   __
   ( /  ) ( /  ( /  / ( /  )   / |  ( /
    /--'   /    /  /   /--<   /--|   /
   /     (/___/(_,/_  /   \__/   |_(/___/
     __,  ___    ,___ __    ______
    (    ( /    /   /( /  /(  /
     \.   /    /  __  /--/   /
   (___)_/_   (___/  /  /_ _/`
NPM
please refer previous post.